TreeCam – Trailer
Story of TreeCam
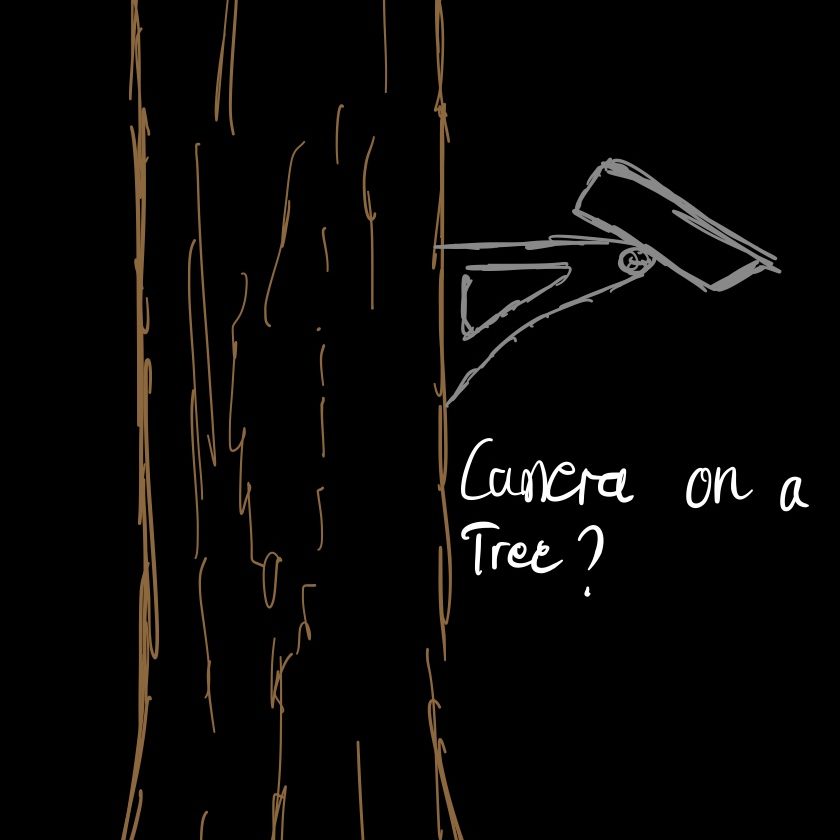
Discovering a Problem
I was practicing field archery at my local range, which is situated in a forest in rural Ontario when I decided I should film some cool footage of me practicing. I then spent the next 10 minutes finding a place to set my phone down without it falling over, only to find the resulting camera angle and footage useless. That’s when I had a thought –
When filming any footage outdoors tripods are usually used. The tripod offers three features:
- Stability – it has three points of contact, which prevents shifting and vibrations caused by the environment.
- Adjustability – Tripods can be adjusted on all three axises, giving you lots of potential camera angles.
- Flexibility – you can place it anywhere, even on rugged terrain, while ensuring the camera is securely mounted.
The problem is, bringing a tripod on a 5km hike not only adds weight, it also wears you down. Cheap tripods (~50 dollars) are heavy; Whereas expensive tripods (often exceeding $800!) are only marginally lighter. Therefore, a lighter, cheaper alternative is desired.
Inspiration & Solution
Being in the middle of a forest, I realized I could just use the trees as my tripod base, since it fulfills two criteria the tripod has: stability and adjustability. Trees are pretty solid, we can adjust the height by simply moving our camera higher or lower, and we can change the angle by rotating the camera along the tree. This leaves us with the third criteria, which is flexibility – how do we quickly change camera placement, from tree to tree?
The answer is simple, by making the process of installing the camera and uninstalling it quicker, we essentially create flexibility.
Therefore, if I can find a way to connect and disconnect the camera to any tree in a quick and secure way, I essentially get all the benefits of a tripod, without the weight and cost of one.
Design Objectives
After careful consideration, I decided, in order for this project to be successful, it must meet three objectives:
- The component must be lightweight and compact – it should fit in a pocket/backpack without taking much space and weight.
- The component must be easy and quick to deploy – it should be able to mount and dismount from a tree in seconds.
- The component must be flexible. – It should offer you lots of room for adjustment when it comes to camera angles.
The Project will follow the following procedures:
- Concept Brainstorm
- Product Design
- Product Manufacturing
- Product Trials
- Conclusion
Brainstorming a Design Approach
Trees are simple objects, they are essentially tubes with varying diameters which has a rough, grippy surface.
The initial idea was to use some kind of claw to instantly grip the camera rig onto the tree. This is the fastest way to Mount and dismount, but it requires sharp metal. Sharp metal means it will need a safety cover, which adds weight. It is also more costly to produce. Therefore this concept was ditched.
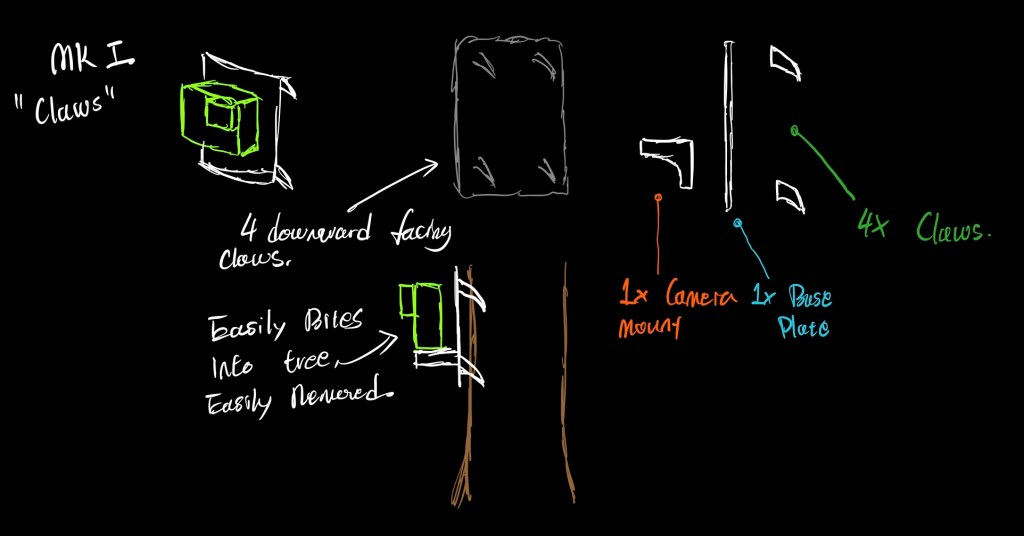
Fig. 2: Initial Design
The second idea is much more realistic, it involves an adjustable strap of some sorts which belts around the tree, the camera is then installed on the strap. This design also allows the user to quickly strap a camera onto a tree at a height and angle they desire.
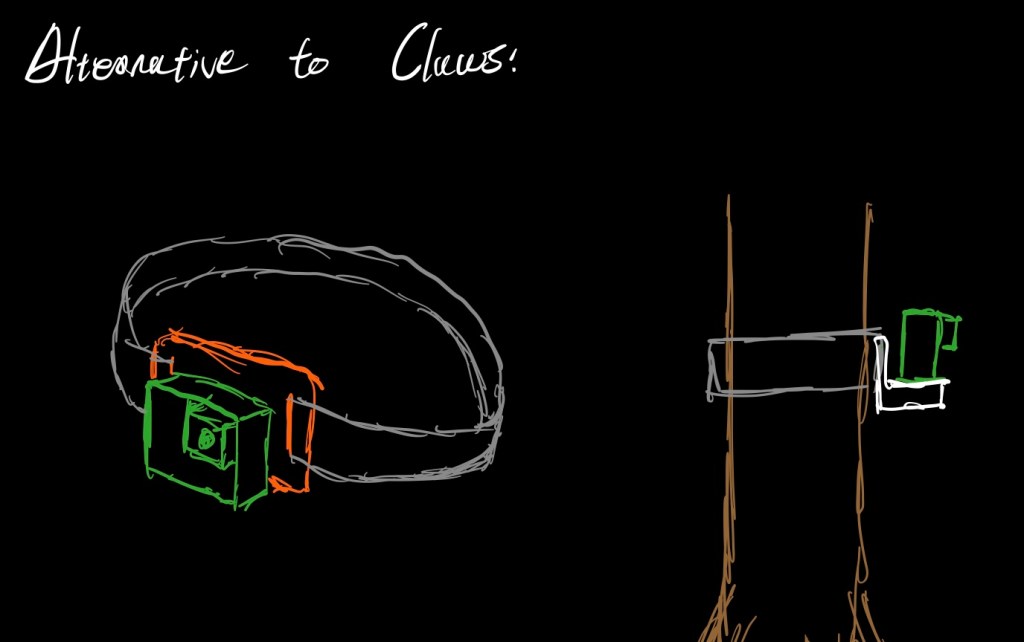
Fig.3: Second Sketch
However, this raises a question: How are we going to mount the camera onto the strap?
- There are many ways to film, the most common way is through a phone, or an action camera, which offers a larger sensor and has better slow motion capabilities
- Neither of them use the same mounting methods (phone requires a spring loaded clip, whereas an action camera often use their own proprietary method of mounting.)
To keep things simple, I decided the best mounting system to use is a GoPro style mount. GoPro action cameras are extremely popular and, a lot of attachments have been made to be compatible with them, including phone mounts. Therefore, we are effectively remixing by combining the GoPro system into our own design.
Design process
With mounting figured out, now it’s time to determine how we are going to put everything together. And it is rather simple. Strap goes on tree, we design a component that connects the camera to the strap, using GoPro’s system. For convenience, we will refer this component as the strap mount.
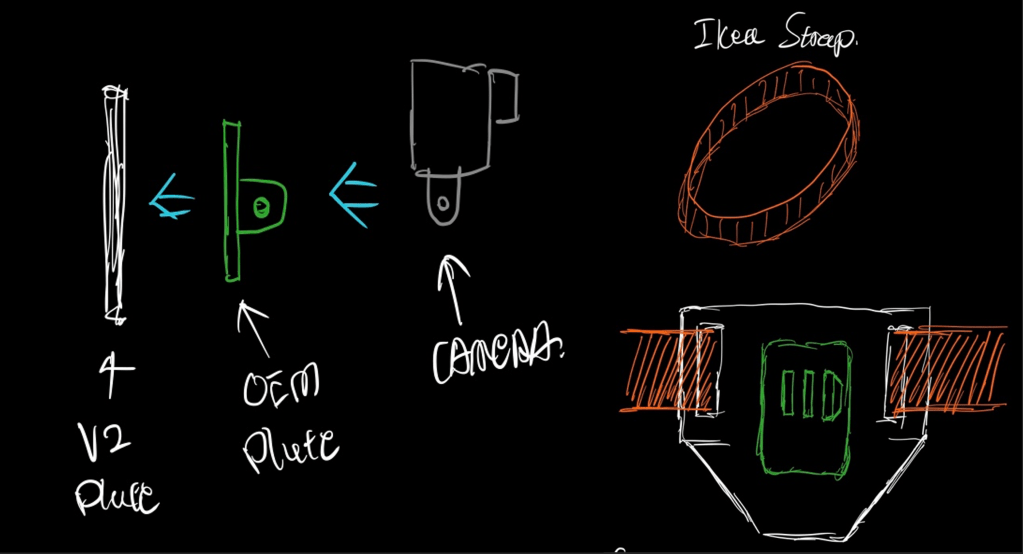
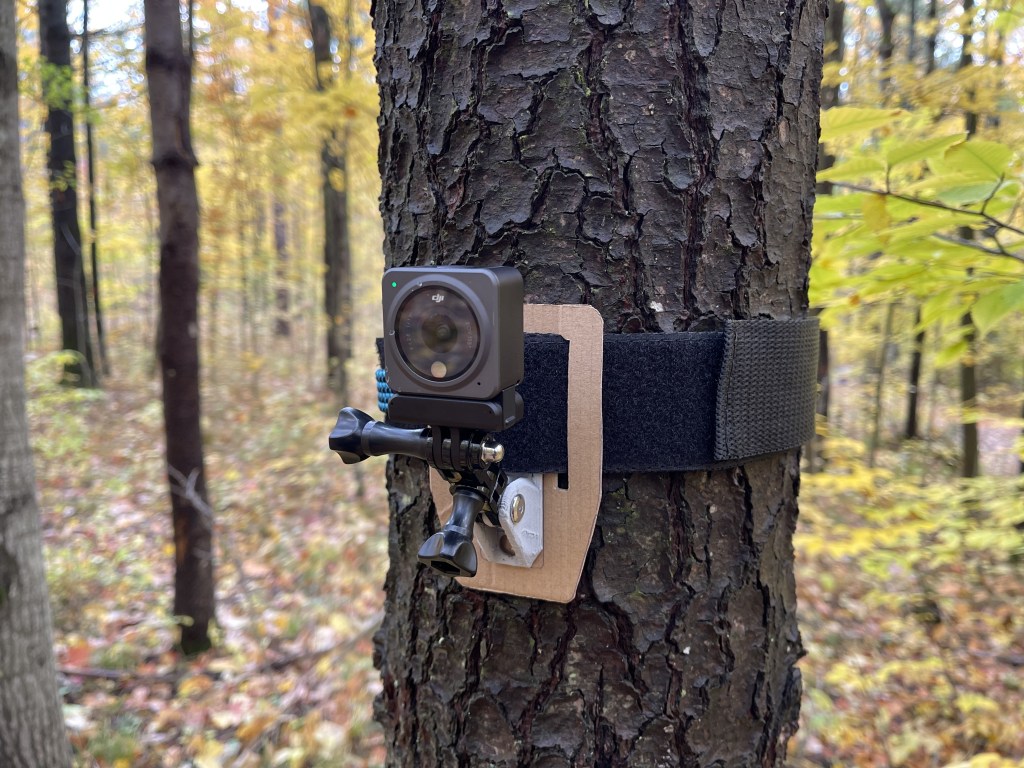
Fig.4: Components of the strap mount. Fig.5: Front view of Cam Mount
We have two objects which are already available: A Velcro strap which came from the packaging of an ikea mattress; and a couple of gopro receiver mounts (Referred in Fig.4 as “OEM Plate”). Given the insane amount of accessories GoPro produces, a tree strap, or one that’s potentially compatible, is not one of them. So we have to either glue or screw an existing GoPro receiver mount onto our strap mount/base plate. See Fig.4.
To attach the mount onto the ikea strap, we simply make a cutout on two sides of the plate and run the belt through. See Figure 5. The camera sits lower than center to compensate for potential deformation of the cardboard. Theoretically, if the camera is mounted too high, or level with the belt, it has the potential to twist the belt and rotate downwards, lowering its center of gravity prevents that from happening. See Figure 6&7.
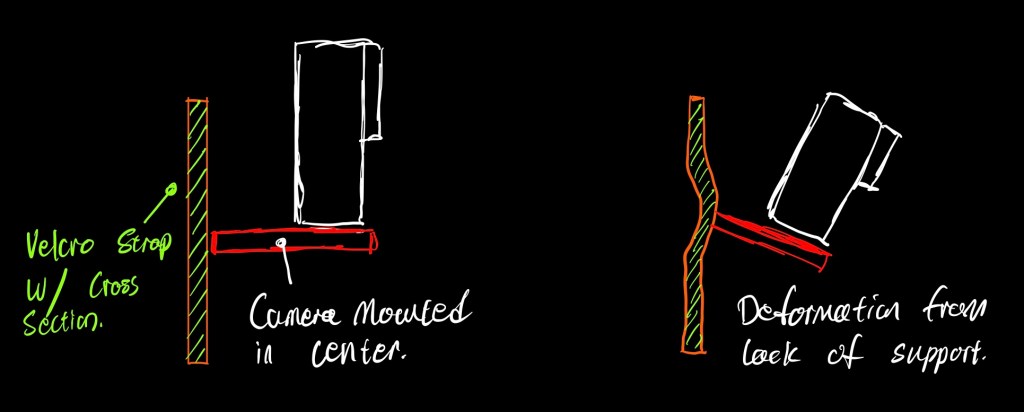
Fig.6. Diagram of deformation
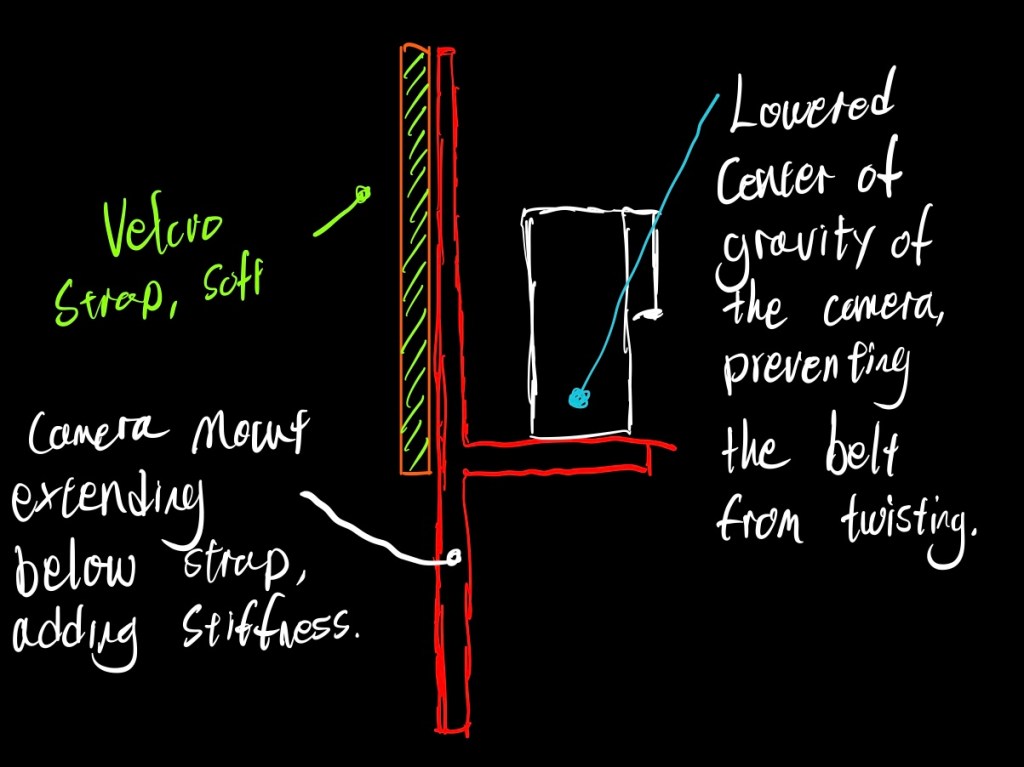
Fig.7: Design changes to prevent strap from twisting.
As such, this design configuration of the treecam will be composed of the following parts:
- An Ikea Strap
- A section of a bungee cord *Added during production, refer to Fig.10-12
- A piece of cardboard/cardboard like material
- A gopro receiver mount
- A piece of 3M double sided tape
Limitations
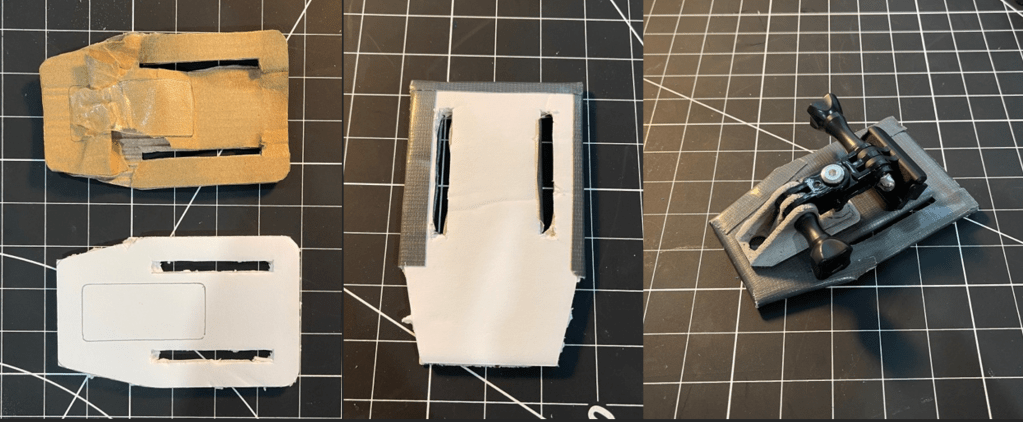
The first limitation surrounds fabrication, this component was originally planned to be 3d printed as that allows it to be one piece, saving more weight and bulkiness. Since that was not allowed, we are using cardboard instead.
The second limitation is a result of the first – if I am only allowed to use basic tools for manufacturing, the materials available would be restricted as a result, materials such as corrugated plastic or metal are out of the equation and I am basically left with just cardboard and the likes. This poses potential strength issues on the product. But as we will see in later sections, this weakness can be fixed.
Fabrication Process – MK1
In order to produce an accurate cut-out without industrial equipment such as a cnc, laser cutter or 3d printer, I printed out the design on a piece of paper with the correct scale, then used that as a trace template to cut out a piece of cardboard from a box.
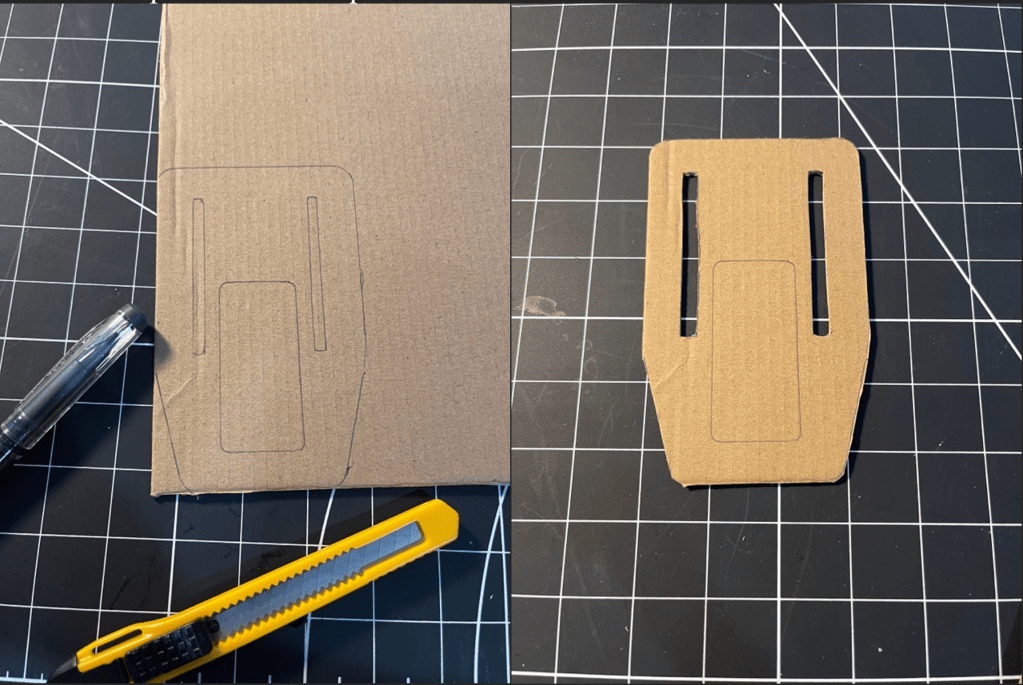
Fig 8&9: Making the first cuts
The cardboard is then installed onto the strap to test for fit.
The strap itself required modification as well, since it was used to hold a rolled up mattress, it needs to be shortened. This is done by cutting out 1/3 of the strap’s length.
While working on it I decided to also add elasticity, as this allows the strap to apply constant tension. The elastic came from a section of a bungee cord, which is sewn onto the strap.
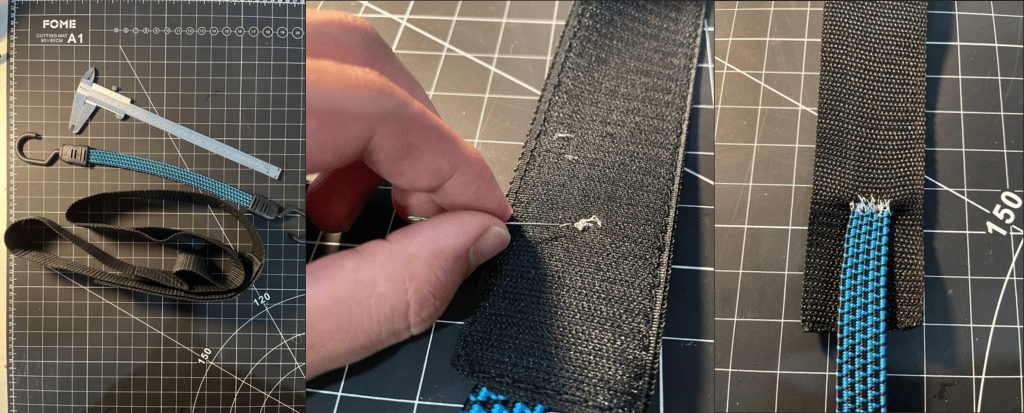
Fig 10, 11, 12: Sewing on the bungee cord.
I then glued the gopro receiver onto the center section, which is also marked on the paper template, allowing it to be perfectly aligned. And the mark one component is complete. See Fig.13.
Testing Process – MK1
The test focuses on two things: Function and Durability. And it is conducted at my local archery range. The durability component of the test consists of the continuous mounting and dismounting onto/off of trees of varying diameters, at different heights.
Functionally speaking the treecam offers more convenience than a tripod when used in a forest environment. It simply folds away and fits in your pockets, more realistically though, your backpack. It weighs almost nothing, surpassing the tripod by a long shot. The strap worked as intended, mounting and dismounting was quick and easy, and the bungee cord held tension – The treecam does not move at all once mounted. The GoPro mount allowed me to mount three different cameras onto it – a phone, a dji osmo, and an insta360 onex2 camera, which is the heaviest. Because of the lowered camera position, It did not twist the belt. Since it began to rain, I mainly used the dji osmo.
As you can see in this photo (Fig. 13), the cardboard had some wrinkles, suggesting a lack of stiffness. Other than that, the treecam met its design objectives.
Durability was a key concern for the mark one, as it is made of a piece of cardboard. It began to rain during the first trial, although the trees themselves were not particularly wet, the cardboard became noticeably moist after some uses. Tears were also noticed along the cutouts for the strap, this can be attributed to:
- Cardboard being weakened after becoming wet;
- The weight of the camera;
- Stress caused by the continued mounting and dismounting.
This indicates a lack of reliability in wet conditions, and failure is expected in the long run.
Fig. 14: Rain droplets bouncing off the camera during its first test.
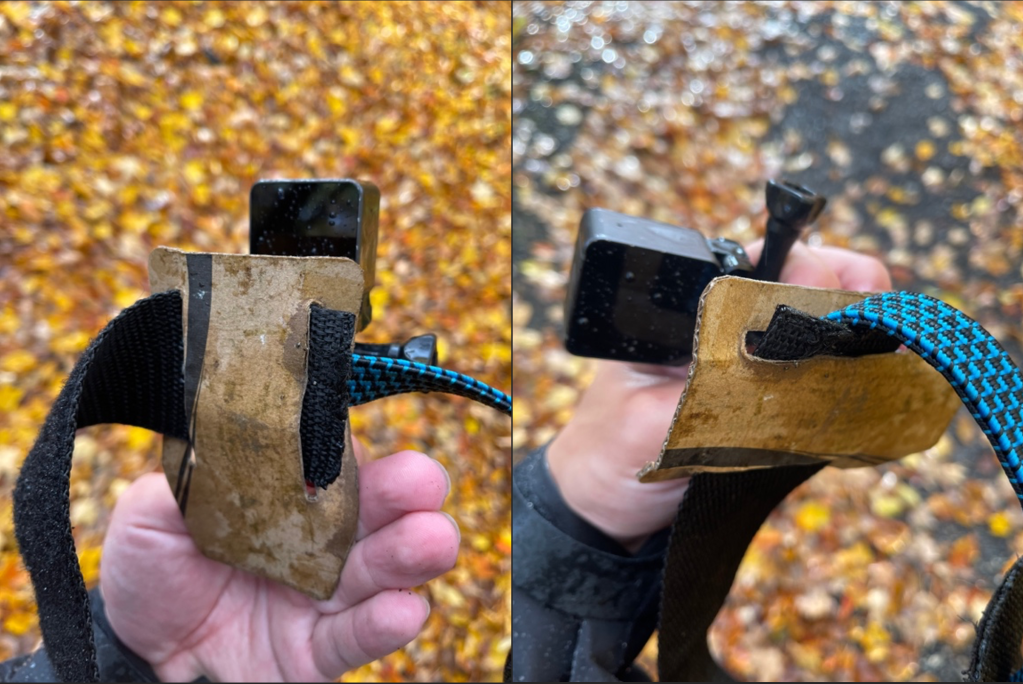
Fig 15&16: Moisture damage to the cardboard. Note the tears around the belt.
Refinement, and Mark Two
We now know that cardboard is not ideal in wet conditions. To combat this issue two approaches are available: One, apply a coating of sorts to ensure seal; Two, make it out of a different type of material.
I had foam sheets in mind (essentially, two layers of paper with a foam layer in between them). This board has the same thickness of cardboard, but its foam core is much stiffer.
Foam boards are still covered by paper, and prolonged exposure to moisture will still weaken it. So I decided to adopt a mixed approach – by using foam boards, but also cover its surface with duct tape. This method best conforms to an assembly line flow – board gets cut, reinforcement tape gets applied, then the GoPro mount is glued on.
Left: Comparison to cardboard; Center: Duct tape being applied; Right: MK II completed

Fig.19-1: MK-II folded up when not in use. Making it more compact.
Testing the MK-II
The mark two retains all the features from the mark one, while being significantly more durable.
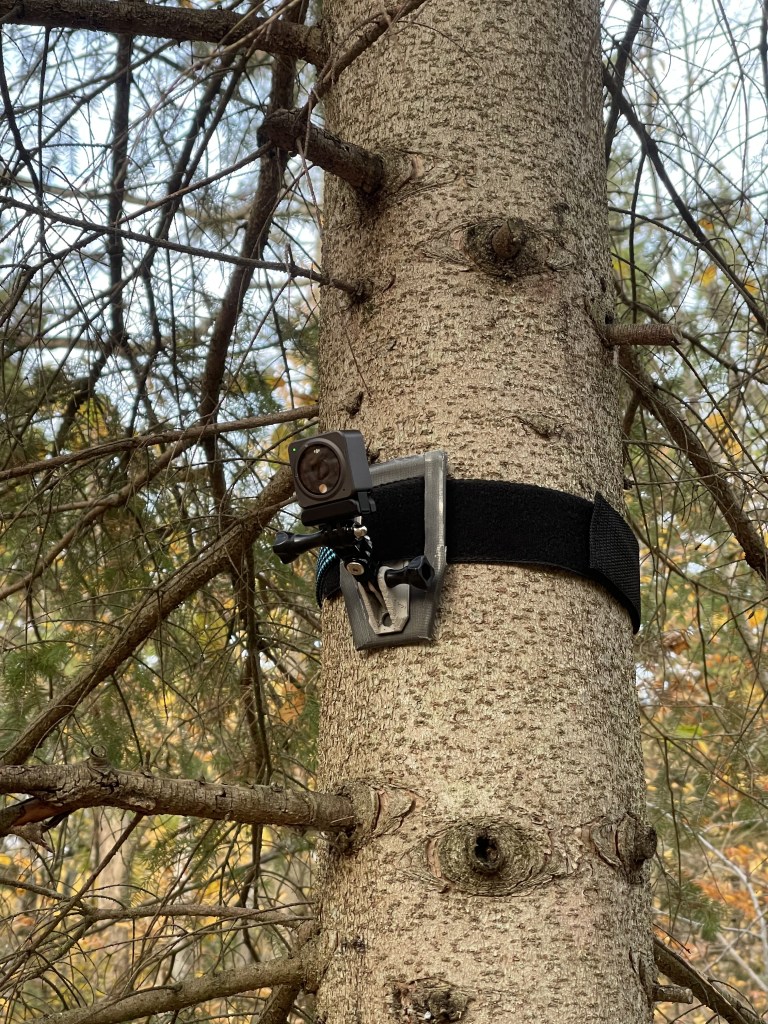
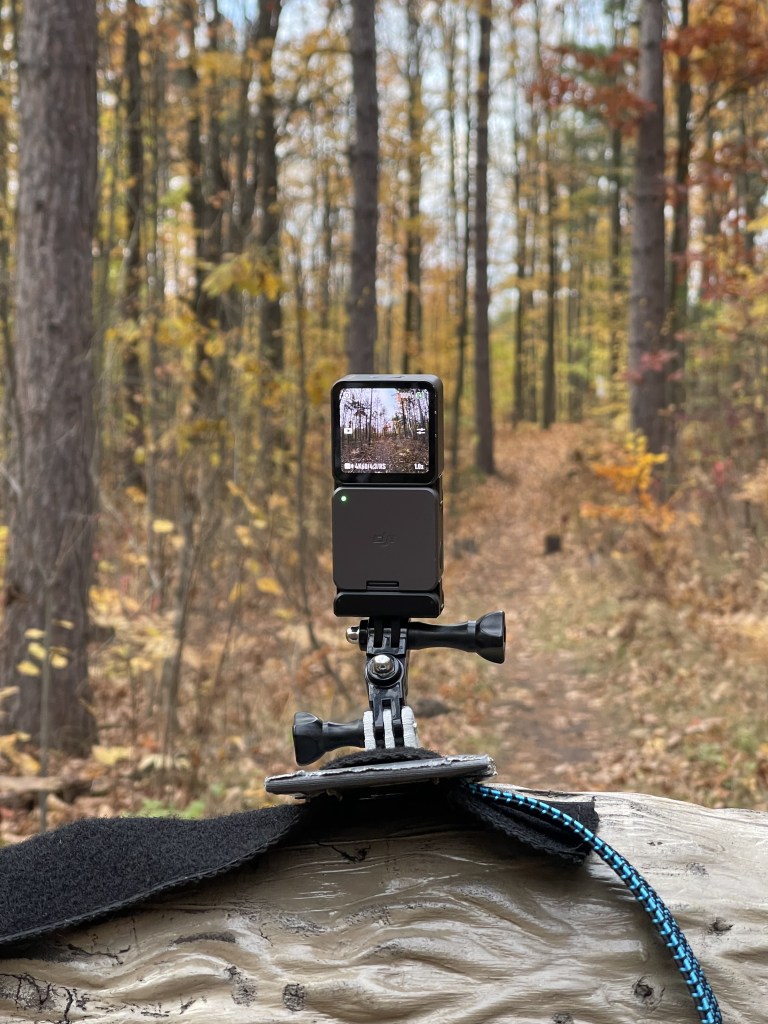
Photo of the mark two in action. Mounted 2.5 meters above ground – beating most tripods in that regard
—
During testing I noticed the TreeCam had more features than initially planned. I discovered many of them while conducting the second and third trial of the MK-II. For example, the strap can be attached to the exterior of my backpack, saving backpack space, as well as the time of opening and closing it:
Other features include:
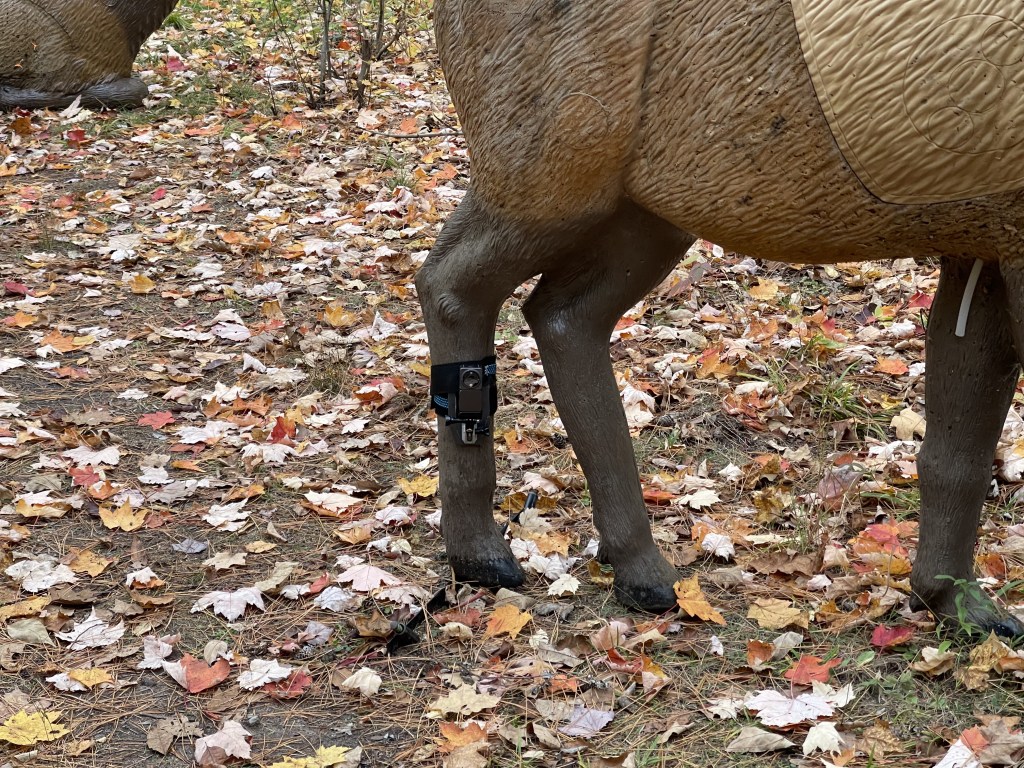
Of course, it doesn’t just strap onto trees. This is a dummy animal, which now acts as a tripod (or monopod).
The base plate acts as a stand of sorts, which allowed the camera to be placed on (relatively) flat surfaces, in addition, note how the base plate is tilted relative to the camera, this adjustment allows the camera to stay level even when the surface isn’t.
More Testing Footage
Here is a simple compilation of videos recorded with MK-1 and MK-2 Treecams:
Mid-Project notes
While I was testing the mark-II I discovered that there are several existing products which had similar features to mine:
- Trail cameras: Used primarily for hunting, and is attached to a tree by a strap. Trail cameras are usually one piece, meaning, their straps are permanently connected to the camera housing and is not compatible with other cameras. Prices range from 100 to 500+ (https://www.digitalcameraworld.com/buying-guides/best-trail-cameras)
- Outdoor camera arms: Also mounted onto a tree via a strap, but they require a large lead screw which is drilled into the tree for stability. Because of the long, metal arms, they are significantly heavier too. Priced around 100 or more. (https://www.gomuddy.com/camera-arms-muddy-outdoors/)
- After doing some more research, it turns out that people have created mounts similar to the first “claw” design as well – using a single large screw which drills into the tree, at the other end of the screw is a different screw for the camera. A device like this lacks flexibility, only cameras with threaded mounts can be used; and once installed, you cannot tilt it left or right. (https://www.youtube.com/watch?v=QjTPa-Jtunc&ab_channel=JaseOutdoors)
This brings up the notion that no matter how original an idea is, chances are, someone has had that idea, or a variation of that idea before. Despite this, The TreeCam is unique in its own ways: It’s universal, it does not damage the tree, it is light, small, and most importantly, it is inexpensive.
Conclusion
The TreeCam met and exceeded all of the design goals and requirements. Not only did it retain the features of a tripod while being extremely light, it has also surpassed tripods (feature and cost wise) in many ways, such as having a virtually non-existent height limit, and super quick adjustments.
Fabrication was the quickest part in this entire process. Testing and figuring out what needs to be improved took a lot of investment. If its designed for the forest, then it must be tested in the forest – for example, cardboard products are great for the environment, but under certain conditions, they’re simply not strong enough for the job, and this conclusion is made possible by product trials.
Pragmatically speaking, this product would have been perfectly manufactured with a tough material like nylon or PET in 2 hours with a capable 3d printer. But that isn’t the point. I am glad I didn’t use FDM 3d printing, not because it violates grading criteria, but because, it brought me back to my childhood, where cad and 3d printers and laser cutters were out of reach and wasn’t even a thing. When All I had was some cutting tools, and a bunch of scrap cardboard. Even hot glue guns were a luxury. Making things by hand, out of passion, can really bring quality to a product, even if it is made with rudimentary materials – because it makes you do the best with everything you have.
To conclude, it was a blast making and testing the TreeCam, it really makes one appreciate the level of technology we have available in 2022.
